It sounds like it should be trivial: Create a WCF web library and host it in IIS. Surely lots of people need to do this, and it will be easy in a fairly modern version of Visual Studio like 2012? Well, I did not find it easy despite reading a Step-by-Step book (Microsoft Windows Communication Foundation by John Sharp, 2007), lots of blog posts and MSDN articles and so on. Of course, in fairness, the book was quite old compared to my development environment, but in several respects it still seemed quite current.
Whatever the reason, I hope this page will offer a useful step-by-step guide to set up a WCF Service Library project to be run from its development folder on Windows 8.0, IIS 8.0 – and I have been using VS 2012 and .Net Framework 4.5 as the target. Also, before I begin, and something of a spoiler alert; you may prefer to publish your website to a specific location, and host it in IIS from there, rather than try and host it from your development folder. This option is covered after the walk-through below.
Lets start with the steps you will need to follow – this is the rough sketch of all the processes you need to undertake:
- In Visual Studio, create your WCF Service Library project and give it a simple implementation – the GetData sample contract is as good as any but I will be demonstrating a highly advanced ‘Hello World’ application below;
- Test using the built-in and default WCF Service Host / Client: when you Debug the WCF Service Library project, you should be presented with the ‘WCF Test Client’ window, and you should be able to call your functions;
- Install Internet Information Services (IIS) if you haven’t done so already:
- From Control Panel | Programs and Features, enable the following:
- Internet Information Services (a number of contained items will be selected automatically, but not all, most notably the FTP Server);
- ‘HTTP Activation’ under ‘.Net Framework 4.5 Advanced Services | WCF Services’ (there is a fairly similar option ‘Windows Communication Foundation HTTP Activation’ under the ‘.Net Framework 3.5 (includes .NET 2.0 and 3.0’ which I guess would be necessary if you were targeting an earlier version of .Net);
- From Control Panel | Programs and Features, enable the following:
- Now, if you definitely want to host the library from its project folder then host the service in IIS we need to follow the next steps. However, you may like to consider Publishing the Website, which has slightly fewer complications at this point!
- Add a new Application to the Default Web Site. Set the Alias to something appropriate like HelloWorldService, and point the physical location to the location of your project on disk (this should be the project folder, not the bin folder beneath it or the solution folder above it);
- Add a svc file to the project folder, the contents will be something like:
<%@ ServiceHost Service="HelloWorldWebService.HelloWorld" Debug="true" %>
(this step is optional if you plan on publishing the service instead, but it may impact the name of the file)
- Change the build output path of your project from bin\Debug\ to bin\
- Copy your App.config file and name it Web.config (IIS does not look at the App.config file)
- To test the service, open a web-browser and enter the address which is probably http://localhost/HelloWorldService/HelloWorld.svc You should see a page which starts with a heading and then the text ‘You have created a service.’. If you add ?wsdl to the URL, you should get a load of XML on the screen which is a description of the service.
Create a Sample HelloWorldService WCF Library
You can download this solution here.
Open Visual Studio (mine is VS2012):
- Click File | New | Project…
- Pick ‘WCF Service Library’ from the options under the WCF heading;
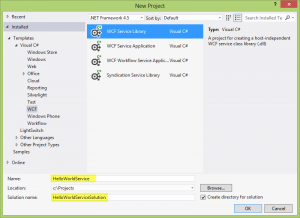
Create a Wcf Service Library Project
- I chose to create a project with the name ‘HelloWorldService’ and the solution folder with the name ‘HelloWorldSolution’ – I’m not normally in the habit of naming my solutions like this, but I didn’t want to have five different things named the same thing which can get pretty unclear while you are learning!
- I used Refactor | Rename to rename the default IService1 to IHelloWorld, and Service1 to HelloWorld – with equivalent renames of the files… I also stripped a lot of the content and created a simple implementation so I had the following:
in IHelloWorld.cs (inside the namespace HelloWorldService):[ServiceContract] public interface IHelloWorld { [OperationContract] string SayHello(string name); }in HelloWorld.cs (inside the namespace HelloWorldService):
public class HelloWorld : IHelloWorld { public string SayHello(string name) { return string.Format("Hello World, and welcome also to {0}", name); } } - The Refactor | Rename function used to rename the interface and classes will probably not change the details of your new contract and class name in the App.config file… the following lines show individual lines in the file that I had to change by hand:
-
<service name="HelloWorldService.HelloWorld">
-
<add baseAddress = "http://localhost:8733/Design_Time_Addresses/HelloWorldService/HelloWorld/" />
-
<endpoint address="" binding="basicHttpBinding" contract="HelloWorldService.IHelloWorld">
-
- Now we can test everything works together properly by pressing F5 – or the Start button. The WCF Test Client window should pop up, and after a short time you should see your service under the My Service Projects node.
- You can test your service by clicking on the method you wish to run, entering a Value such as KebabShopBlues in the Request portion of the screen, and clicking Invoke. The lower ‘Response’ part of the screen should show a value of:
“Hello World, and welcome also to KebabShopBlues” - If this has all worked ok, you should have some confidence that the solution is basically working correctly.

Install Internet Information Services
Please remember that this walk-through is specifically regarding Windows 8.0 and IIS 8.0 – if your versions differ I am sure there will be some changes:
 From Control Panel (Window key + x, p) run Programs and Features, and click ‘Turn Windows Features On or Off’ at the left of the dialog;
-

Install IIS Options
If they are not already checked / ticked (or have a little solid square in the check-box):
- Click the box next to ‘Internet Information Services’ – by default it does not seem to select all the contained options, so a small solid square appears in the checkbox;
- Click ‘HTTP Activation’ under ‘.Net Framework 4.5 Advanced Services | WCF Services’;
- Click OK to start the installation – it may take a few minutes;
- You should now be able to run Internet Information Services (IIS) Manager (I’ll just call this IIS Manager from now on):
- Press the Windows button and type iis: it should highlight the relevant program, which you can start by pressing Enter / Return;
- Inside IIS Manager, the Default website should look something like this:


Host the WCF Service Library in IIS
The following section assumes many things, probably most importantly that your IIS Manager has a default website that is configured on your own computer, as seem in the section above. We need to create an Application to run the service:
- In IIS Manager, in the Connections window make sure you can see the Default Web Site node, right click it, and then left-click ‘Add Application…’;
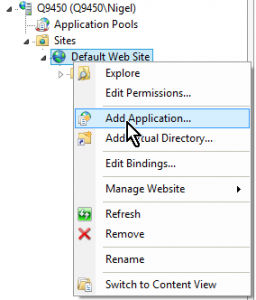
IIS Add Application Menu
- In the resulting dialog box, enter an alias of ‘HelloWorldAlias’ (again, I have picked this name so it is easier for us to differentiate this name from others as we learn), and enter the physical path to your project folder, which in my case is ‘C:\Projects\HelloWorldServiceSolution\HelloWorldService’;
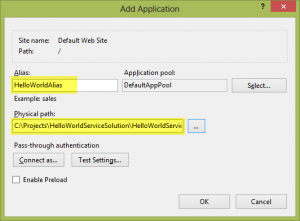
IIS Add Application Dialog
- Click OK and your new site ‘HelloWorldAlias’ will appear under the Default Web Site node;


Give Instructions to IIS on how to Host the Service
These steps are only necessary if you don’t want to Publish the Service instead (see below).
We now need to give instructions to IIS on how to host this service, which we do in the form of a *.svc file… more specifically, the file must be called <your Service Name>.svc:
- In Visual Studio, right-click the project and click the Add New Item… menu; select the Text File option, and enter the file name as HelloWorld.svc;
- Edit the file to give the following content (note, this name must match the name we put in the App.config earlier exactly, essentially is is Namespace.ClassName:
-
<%@ ServiceHost Service="HelloWorldService.HelloWorld" %>
-
- At this point, you may be interested to try and point a web browser to the site… for this walk-through the URL is:
‘http://localhost/HelloWorldAlias/HelloWorld.svc‘.
For me at this time, when I do this, I get a yellow-screen error stating (among other things):The type ‘HelloWorldService.HelloWorld’, provided as the Service attribute value in the ServiceHost directive, or provided in the configuration element system.serviceModel/serviceHostingEnvironment/serviceActivations could not be found.
- This error is essentially stating that IIS can not find the relevant binaries for the service defined in the svc file. By default, it looks in the bin folder in the Application folder… but by default a Wcf Service Library builds inside the bin/Debug or bin/Release folders! We can correct that in Visual Studio by right-clicking the HelloWorldService project, and left-clicking Properties. Open the Build tab, and change the Output path: setting from ‘bin\Debug\’ to ‘bin\’:
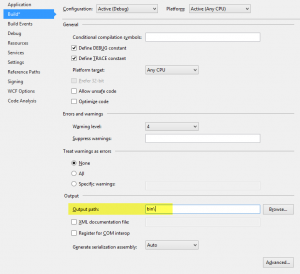
Wcf Project Build Output Path
If you now rebuild the project and refresh your browser view, you should clear the ‘could not be found’ error noted above, and the system will now show a page stating that ‘Metadata publishing for this service is currently disabled‘.
You may be puzzled reading much of this page and following the instructions, because almost everything is suggests is already in your App.config file! However, read on for a bit more information you need: - You now need to supply a Web.config file for IIS. For some reason, IIS will not read the App.config file (and in case you were wondering, the WCF Test Client window we used earlier barfs without the App.config file! If you want to try it out quickly, just copy your App.config file and rename the copy as Web.config. At this point, refreshing your browser window should present you with a ‘HelloWorld Service’ screen:
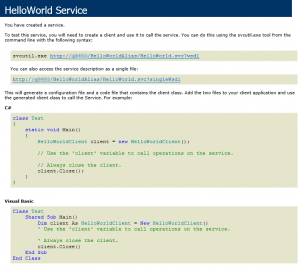
WCF Hello World Service
- To be honest, I had expected to have to address an issues with folder permissions on the project’s directory at this point, but as it happens I did not have to when doing this walk-through. It seems likely that I learnt incorrect information while trying to solve my previous problem… but refer to the heading ‘Which User Runs my Site Anyway?’ for a bit more information in this area.


Isn’t Duplicating Configuration Bad Practice?
Isn’t duplicating the App.config file in Web.config bad practice? Probably. There are some options hinted at here that might reduce the duplication, but this whole walk-through came about because of the book I had that suggested it.. and this, I am sure, was at least partly driven by a desire not to add additional projects to a busy solution if that could be avoided. However, one possibility that became available is to Publish your project to a specific folder, covered next.
Publish the Library to a Specific Location
If you are not so bothered about running the library from its project folder, you can consider ‘publishing’ it to a local disk (or many other choices) and hosting it from IIS that way. Follow the steps to try publishing the library to a specific location:
- In Windows Explorer, add a folder that you want to publish your WCF library to – in this case I chose the folder C:\Projects\HelloWorldPub;
- In Visual Studio, right-click the HelloWorldService project, and left-click Publish…
- You will be presented with an ‘Open Web Site’ dialog, and you should identify the folder you created on the file-system:
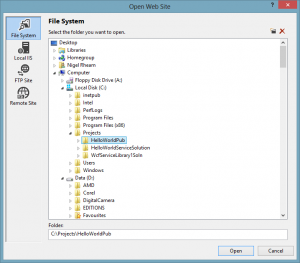
Open Web Site Dialog
- Having clicked Open, you will return to the main Publish dialog:
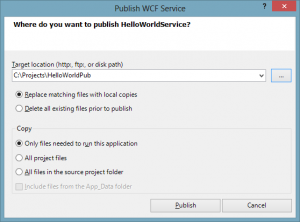
Wcf Publish Dialog
We can just accept the default options shown;
- When you click the Publish button, the necessary files will be copied to the new location, and this actually includes the binaries and it renames the app.config into Web.config! You may also note that this process creates a svc file for you – it faithfully copies the one we created called HellowWorld.svc, but it also creates one for us as HelloWorldService.HelloWorld.svc!
- In IIS Manager, add a new Application folder pointing to this new HelloWorldPub folder; I created the alias with the name HelloWorldPubAlias;
- Now this service should be accessible from your web browser, in this case with the address:
http://localhost/HelloWorldPubAlias/HelloWorldService.HelloWorld.svc
and also, as long as you created the file earlier:
http://localhost/HelloWorldPubAlias/HelloWorld.svc
- This process shows us that the publish tool can create a svc fie for us if we didn’t do it (with a slightly longer name), and also maps that App.config to a Web.config.


Summary
At this stage, you now have two methods which will hopefully help you to host a WCF Library project using IIS. You haven’t even built a client to the service yet! Speaking for myself, I was happy with the built-in WCF hosting that you get by default with these projects, until I started trying to implement Inversion of Control following a book by Mark Seeman. Without getting into too many details, that is not possible without some fairly complex additions to a WCF project that can not be hosted by the tools integrated with Visual Studio.
At this point, my slight preference will be towards publising the project to avoid having to write a svc file myself, and duplicate the App.config file. However, either implementation may have issues that I am yet to discover, such as issues while debugging perhaps?
Why is Web.config So Important?
The lack of a Web.config left me scratching my head, screaming, starting again from scratch, and so forth, for hours – adding in other changes that did impact the message I saw, I really thought that is was ‘seeing’ the App.config file for quite a while. The best reason I have been able to ascertain why this problem exists is from a comment by marc_s on this Stack Overflow page:
when the WCF service is hosted in IIS, it’s behaving like a web app and thus will be using a
web.config– not its app.config …. Also: the .NET configuration system never uses theapp.configfor a class library – you need to put the settings into the hosting app’s configuration. – marc_s Mar 16 ’12 at 13:19
So essentially, when this library is being hosted by IIS, IIS needs a Web.config… and if we had hosted it elsewhere (perhaps in our own process) we would have needed to duplicate configuration data to that application’s configuration file.
There is some WCF configuration documentation, part of which says:
When configuring a service in Visual Studio, use either a Web.config file or an App.config file to specify the settings. The choice of the configuration file name is determined by the hosting environment you choose for the service. If you are using IIS to host your service, use a Web.config file. If you are using any other hosting environment, use an App.config file
Which User Runs my Site Anyway?
When you research IIS security (especially if you have a past that includes work with ASP.Net websites, you will probably have heard of the NETWORK SERVICE account… but that information is outdated as at IIS8.0 (and I believe this changed at IIS 7 or 7.5). Now, the default identity that an application pool runs under is something called ‘ApplicationPoolIdentity’. This is not a windows user, but it actually maps to a distinct user per application pool. Thus, the DefaultAppPool, when set to run with identity ApplicationPoolIdentity will actually be run with a principal ‘IIS APPPOOL\DefaultAppPool’ and if you set up a pool of your own such as ‘HelloPool’ then the user will be ‘IIS APPPOOL\HelloPool’. This is at least sort-of a virtual user (this is vague terminology but I am learning as I type) – but they seem to be part of a new group called IIS_IUSRS if I understand this link correctly. This link is also useful, though both are a little old I think they are current (enough) for IIS 8.0.
Many of the examples and guides I saw when first figuring this out suggested that I give NETWORK SERVICE user and IIS_IUSRS group ‘Read & execute’, ‘List folder contents’ and ‘Read’ permissions on the project folder. As it happened, it seems I did not need to do this for the walk-through above, as apparently the site was getting permissions through some other means.
Absolutely fabulous.
It works as a charm!
Thank!
thanks you, I really appreciate your effort, it really save my lot of time.
If you get an error such as:
The page you are requesting cannot be served because of the extension configuration .[… bla bla bla]
Follow those instructions:
http://stackoverflow.com/questions/11460142/cannot-serve-wcf-services-in-iis-on-windows-8
thanks it help me.
The life saver was the HTTP Activation under .Net 4.5, added it to my server and all was good.